Kartenfunktionen sind im mobilen Bereich ein wichtiges Feature. Kaum eine App gewinnt nicht an Wert, wenn sie Karten darstellen kann. Apple und Google machen mit ihren Map-SDKs vieles richtig, aber manchmal stößt man an Grenzen - sei es aus rechtlichen Gründen oder wegen eines Bugs. In meinem Fall war Letzteres der Auslöser. Ich brauchte außerdem eine Alternative, die auch offline funktioniert.
BlogErweitere deine Xamarin.iOS-App mit OpenStreetMap
Was ist das OpenStreetMap-Projekt?
Das OpenStreetMap-Projekt hat das Ziel, geografische Informationen wie Straßen, Flüsse oder Häuser bereitzustellen. Wenn du möchtest, kannst du diese Informationen selbst ergänzen. OpenStreetMap unterscheidet sich von Google oder Apple vor allem dadurch, dass du auch Zugriff auf die Rohdaten bekommst. Das ist großartig, wenn du eigene Karten oder Routing-Informationen erzeugen möchtest. Mehr über dieses spannende Projekt findest du auf www.openstreetmap.org.
Eine OpenStreetMap darstellen
Wenn du deine Xamarin.iOS-App mit Kartenmaterial aus dem OpenStreetMap-Projekt erweitern möchtest, musst du zunächst die neueste OSMSharp-Version herunterladen und referenzieren. Erstelle danach eine neue Xamarin.iOS-Single-View-App und füge alle im ZIP-Archiv enthaltenen Dateien als Referenz hinzu. Die damaligen NuGet-Pakete funktionierten in meinem Fall nicht, deshalb wurden die Assemblies direkt eingebunden.
Ein wenig Hintergrundwissen vorab: Die meisten Map-SDKs arbeiten schichtbasiert. Jede Ebene wird für unterschiedliche Informationsarten genutzt. Wenn du zum Beispiel einen Marker hinzufügen willst, sollte dieser möglichst weit oben liegen, damit er immer sichtbar bleibt. Auch Stadt- und Straßennamen liegen typischerweise oberhalb der Basiskarte.
Der zweite wichtige Punkt ist, dass solche SDKs mit einem Kachelraster arbeiten. Jedes Rasterfeld wird mit einer Tile gefüllt, also einem kleinen Bildausschnitt der gesamten Karte.
Bevor eine Karte dargestellt werden kann, brauchen wir einen Tile-Provider. OpenStreetMap stellt auf seiner Website eine kleine Liste mit Tile-Servern bereit. Ebenfalls hilfreich ist ein Blick auf https://wiki.openstreetmap.org/wiki/Tileserver.
Mit einem Tile-Server lässt sich eine Karte bereits in wenigen Zeilen Code in ViewDidLoad initialisieren:
public override void ViewDidLoad()
{
    base.ViewDidLoad();

    try
    {
        Native.Initialize();

        var _mapView = new MapView(View.Frame);
        _mapView.MapCenter = new GeoCoordinate(52.207767, 8.803513);
        _mapView.MapZoom = 12;
        _mapView.Map.AddLayerTile("http://a.tile.openstreetmap.de/tiles/osmde/{0}/{1}/{2}.png");

        View.AddSubview(_mapView);
    }
    catch(Exception ex)
    {
        Console.WriteLine(ex);
    }
}
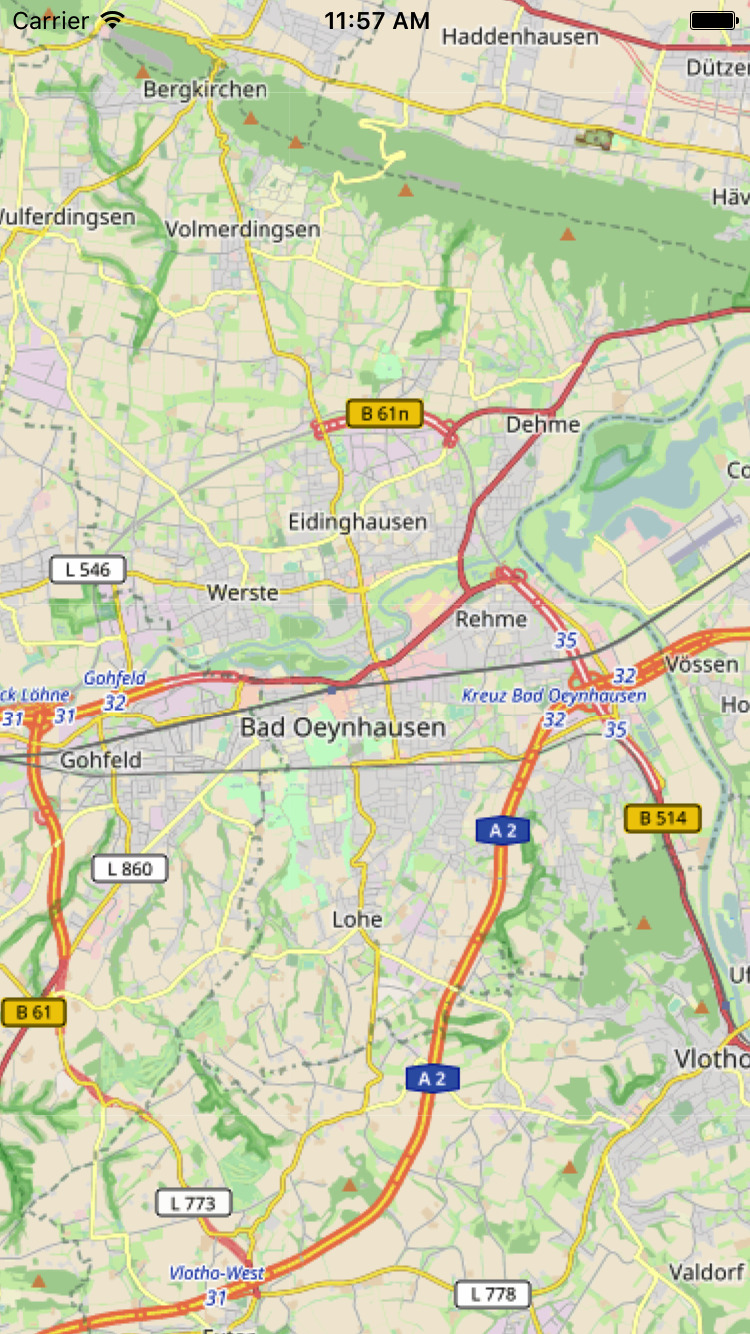
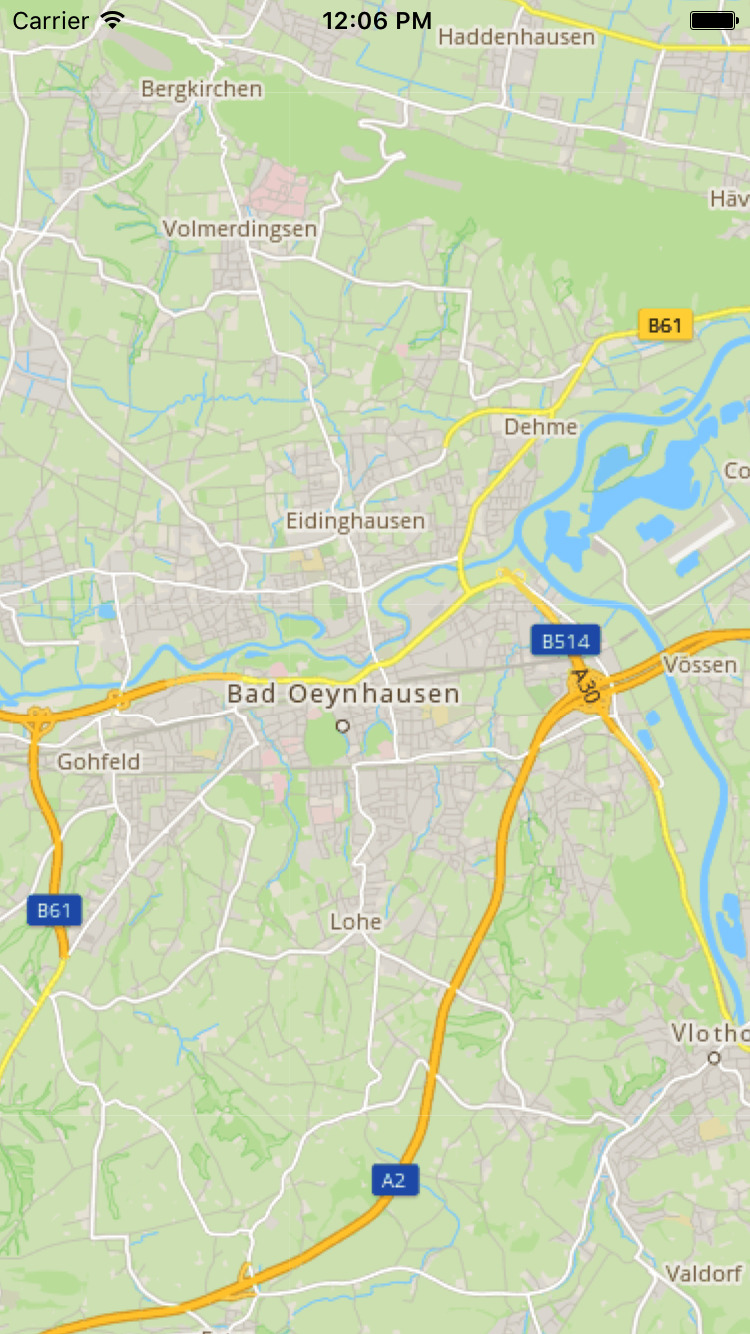
Das Bild links zeigt die Karte im Standardstil von OpenStreetMap. Wenn wir einen anderen Tile-Server als Quelle verwenden, erhalten wir - wie rechts zu sehen - ein optisch ansprechenderes Kartenbild.
Marker mit OSMSharp anzeigen
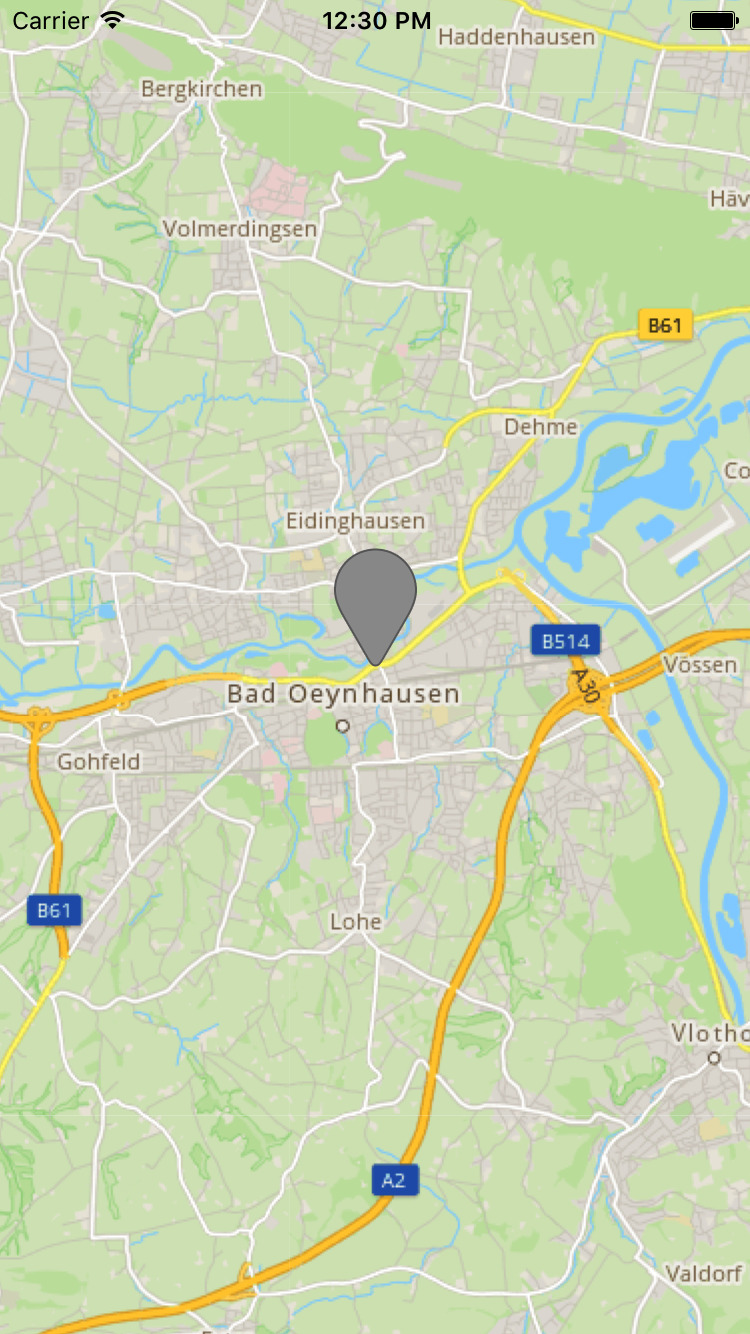
Wir haben die Karte auf den Hauptsitz von Cayas Software zentriert. Jetzt ist es Zeit, einen Marker hinzuzufügen, damit dieser Punkt leichter erkennbar wird. Dafür brauchen wir zwei Informationen:
die Position, an der der Marker erscheinen soll
ein Bild, das den Marker repräsentiert
Danach ist der Rest nur noch ein kleines Stück Code:
var marker = new MapMarker(new GeoCoordinate(52.207767, 8.803513), MapControlAlignmentType.CenterBottom, UIImage.FromFile("pin.png"));
_mapView.AddMarker(marker);
In diesem Beispiel ist der Marker nicht klickbar und zeigt keine weiteren Informationen an, damit es einfach bleibt. Wenn du ein Popup ergänzen möchtest, lohnt sich ein Blick auf die Methode AddPopup.
Offline-Funktionalität hinzufügen
Einer der Hauptgründe, warum ich mit OSMSharp und OpenStreetMap experimentiert habe, war die Möglichkeit, Karten auch in Offline-Szenarien zu nutzen. Gerade in der iOS App Entwicklung für Außendienst-, Logistik- oder Baustellen-Apps ist das ein wiederkehrender Anwendungsfall. OSMSharp bietet dafür mehrere Lösungen mit jeweils eigenen Vor- und Nachteilen. Hier liegt der Fokus auf MBTiles als Datenquelle, aber osm.pbf-Dateien können auf ähnliche Weise verwendet werden.
MBTiles sind im Grunde SQLite-Datenbanken, während osm.pbf-Dateien Google Protobuf zum Speichern der Karteninformationen verwenden. Je nach Informationsdichte - also Straßen, Städte, Flüsse - und Kartengröße - ganze Welt, Land oder Region - können diese Dateien sehr groß werden.
In diesem Beitrag binde ich meine mbtiles-Datei als BundleResource ein. Dadurch ist sie bereits in der App enthalten und muss nicht erst heruntergeladen werden. In einem realen Projekt würdest du möglicherweise anders vorgehen, aber der Ladevorgang bleibt gleich: Du holst dir einen Stream auf die Datei und gibst dem MBTile-Layer den Namen der Datenbank.
using (var mapStream = File.OpenRead("./demo_layers.mbtiles"))
{
    _mapView.Map.AddLayer(new LayerMBTile(SQLiteConnection.CreateFrom(mapStream, "map")));
}
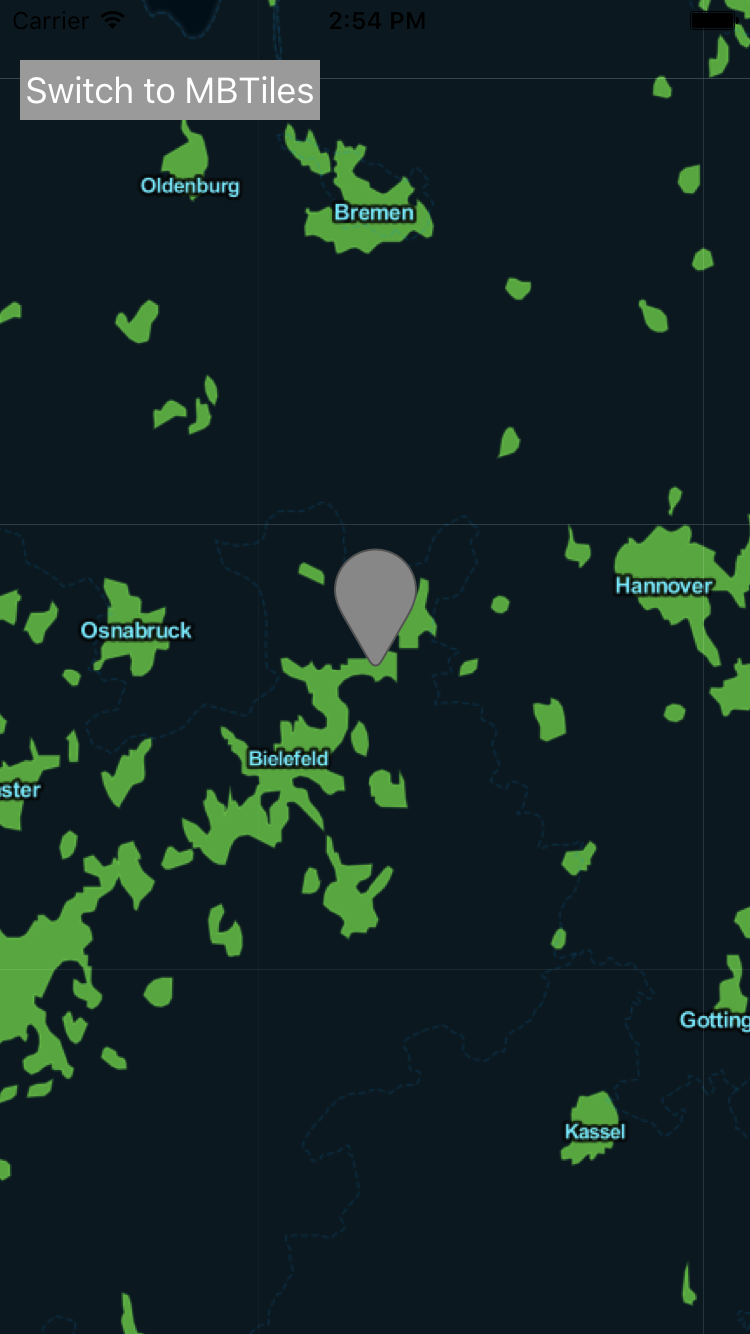
Damit der Unterschied zwischen Online- und Offline-Karte sichtbar wird, habe ich für die Offline-Karte einen anderen Stil gewählt. Außerdem ist der Zoom-Level höher eingestellt, um Platz in der MBTiles-Datei zu sparen. Das Ergebnis sieht dann so aus:
Das Demo-Projekt und alle Dateien findest du auf bitbucket. Wenn dir der Artikel gefallen hat oder du Fragen hast, hinterlasse gerne einen Kommentar.
OpenStreetMap ist ein offenes Kartenprojekt, in dem geografische Informationen wie Straßen, Flüsse oder Gebäude gemeinschaftlich gesammelt und gepflegt werden. Im Unterschied zu klassischen Plattformen bekommt man hier auch Zugriff auf die Rohdaten.
Mit OSMSharp laden Sie eine Kartenansicht, setzen Kartenmittelpunkt und Zoom und binden über einen Tile-Server das gewünschte Kartenmaterial ein. Danach können Sie Marker und weitere Layer hinzufügen.
Ja. OSMSharp kann Karten auch aus lokalen Datenquellen wie MBTiles laden. Dazu wird die Datei als Ressource eingebunden und anschließend als Layer in die Kartenansicht geladen.
Sebastian Seidel
Als Mobile-Enthusiast und Geschäftsführer der Cayas Software GmbH ist es mir ein großes Anliegen, mein Team und unsere Kunden zu unterstützen, neue potenziale zu entdecken und gemeinsam zu wachsen. Hier schreibe ich vor allem zur Entwicklung von Android und iOS-Apps mit Xamarin und .NET MAUI.
Bluetooth Low Energy mit .NET MAUI: Dieser Artikel zeigt, wie sich BLE-fähige Geräte plattformübergreifend für Android und iOS ansprechen lassen. Als Praxisbeispiel dient der LEGO Porsche GT4 e-Performance mit dem offiziellen LEGO Wireless Protocol, inklusive Hub-Service, Port-Erkennung und Motorsteuerung.
Spracheingabe macht es möglich, gegessene und getrunkene Lebensmittel intuitiv zu erfassen, ohne ständig auf ein Gerät schauen oder tippen zu müssen. Statt alles mühsam per Hand einzugeben, können Nutzer Mahlzeiten und Snacks einfach per Sprache dokumentieren. Das spart Zeit und senkt die Hürde für eine regelmäßige Erfassung.