Update
Unfortunatly Bitrise removed support for Xamarin projects by the end of 2021. While existing workflows stil contains the now depricated build steps, the required infrastructur behind is not available anymore. Read more about the reasons behind the decision to end support at the bitrise blog and how you can stil use bitrise to build Xamarin apps.
Additional CI and CD Requirements
To the normal requirements for a CI and CD process we added the following additional requirements:
- hosted/ online
- Xamarin support out of the box
- easy to use
- easy to set up
- extensibility
- affordable.
Why Bitrise?
Bitrise main focus is on mobile app development with out of the box support for Xamarin to an affordable price. For Indy and hobby developer or very small teams is a free tier available that is limited to a single concurrency. This means that your team can set up multiple workflows to build and deploy your mobile app, but only one can run at a given time. If there is a need to run multiple workflows at the same time an upgrade to the pro version is necessary.
Beside the fair pricing Bitrise also comes along with a huge list of extensions that are very easy to integrate into an existing or new workflow.
Set up a basic workflow for your Xamarin app
After signing up at bitrise.io you will find yourself at the quick-start guide where you can choose to set up a new app or start with a sample app. In this post we start with a new app to demonstrate how easy it is to set up a workflow with Bitrise.
Following basic steps need to be done:
- Step 1: Configure the source repository
- Step 2: Select a build configuration
- Step 3: Set up Webhooks
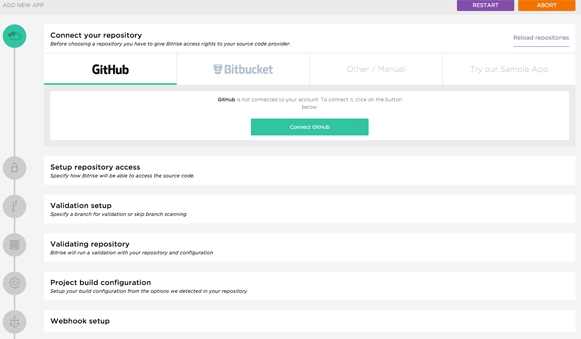
The first step is to choose where the sources can be accessed by Bitrise. In our case it is Bitbucket. With a single click it authenticates and integrates Bitbucket into your Bitrise account. Furthermore, we need to select a repository we want to build with this workflow. Bitrise will then run a validation task in which it clones the repository and try to detect the type of project it is. In our case it identified our repository as a Xamarin project and pre-selected that configuration for us.
Select Build Configuration
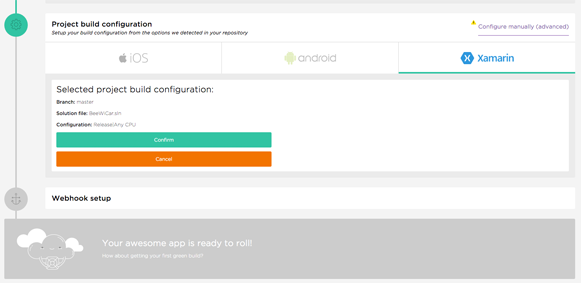
After the initial repository configuration is done, we are ask to select and confirm the build configuration we want to work with. At the moment we also can set up our Xamarin account information. This step can be skipped. I expect that this step isn't necessary any more in a near future, now that Xamarin is open source.
Set up Webhooks
To notify Bitrise that there are changes in our repository, we need to set up a webhook that will automatically be executed on every push to the selected branch. For Bitbucket and GitHub as well as for Visual Studio Online Bitrise is able to add this type of webhook if administrative rights are applied to the connected account.
Everything is now set up for the first run. Time to hit Start a build and if all is set up correctly you should see a success entry. This is the easiest way of setting up a Continuous Integration and Deployment system in less than an hour.
Extending the workflow
The basic workflow we set up suits our need to build our project. Now it is time to extend it to with other services like HockeyApp, NUnit runner or Xamarin Test Cloud to name a few.
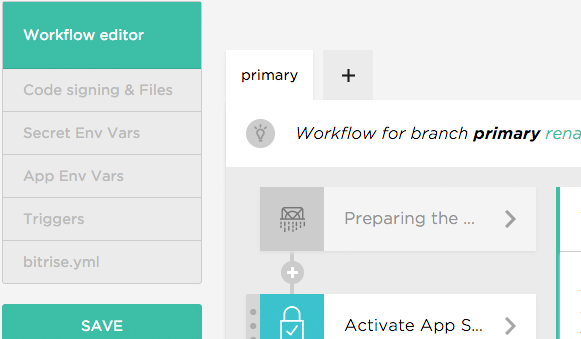
On the apps dashboard select Workflow. This brings up the current workflow we configured early through the guide. Additional changes can be made through the Manage Workflows button in the top right corner which start the Workflow editor.
Each step is now editable and can be moved with drag and drop. Additional steps can be added with the plus sign.
Adding Xamarin.Insights to the workflow
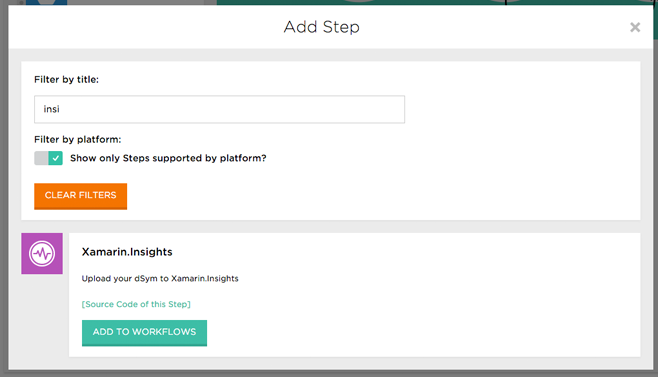
To add Xamarin.Insights to the current workflow hit the plus sign after the Xamarin builder step. In the Add Step dialog select Xamarin.Insights and click Add to Workflow.
Xamarin.Insights is now added to the workflow and can be configured through the form on the right sight of the Workflow editor. Very easy.
Steps worth to add
We experimented a lot to streamline our development process to make it smooth and fast while easy to maintain. I want to share some steps that proved worth to add to make the integration and deployment process as autonomous as possible:
- Script (for every thing if there is no step available)
- NUnit runner
- Xamarin.Insights (Which will integrate into HockeyApp in near future)
- Xamarin Test Cloud (for Android & iOS)
- Set Android Manifest Version Code and Name
- Sign APK
- Google play deploy
- Set Xcode Project Build Number
- Deploy to iTunes Connect
- HockeyApp Deploy (for Android & iOS)
Conclusion
Bitrise is a mature alternative for setting up a self-hosted CI and CD process that is worth to evaluate. The huge extensibility with custom and predefined build steps makes it easy to use at a minimum of maintenance efforts. We at Cayas will recommend it to customers who are looking for exactly that.
Sebastian Seidel
Als Mobile-Enthusiast und Geschäftsführer der Cayas Software GmbH ist es mir ein großes Anliegen, mein Team und unsere Kunden zu unterstützen, neue potenziale zu entdecken und gemeinsam zu wachsen. Hier schreibe ich vor allem zur Entwicklung von Android und iOS-Apps mit Xamarin und .NET MAUI.


